Are you planning to watch the 2024 solar eclipse with your students? Or are you learning about eclipses in science and looking for engaging ideas? Try this solar eclipse craft activity for kids to show the five stages of a solar eclipse – first contact, second contact, totality, third and fourth contact.
This fun, hands-on activity is perfect for science lessons, or before watching a solar eclipse. The example shows the stages of a total solar eclipse but you could adapt it for other types (e.g. annular or partial eclipses).
What is a total solar eclipse?
A total solar eclipse happens when the Moon passes directly between the Sun and Earth. This causes the Sun to be completely obscured, making it dark during the day! During a total solar eclipse, the Sun’s corona, or outer atmosphere becomes visible.
Making the solar eclipse craft
You can see the full tutorial over on my YouTube page, or use the written guidance below.
What you need:
☀️Black, yellow, white paper or cardstock
☀️Scissors
☀️Glue
☀️Round objects to draw around (1 for the main sun, the other for the smaller suns/moons). Cups/glasses/coins etc work well for this.
☀️Ruler
☀️Pencil/pen
Optional:
☀️Googly eyes for extra fun
☀️Pipe cleaners (yellow or orange)
☀️Tape
Directions for making the solar eclipse science craft
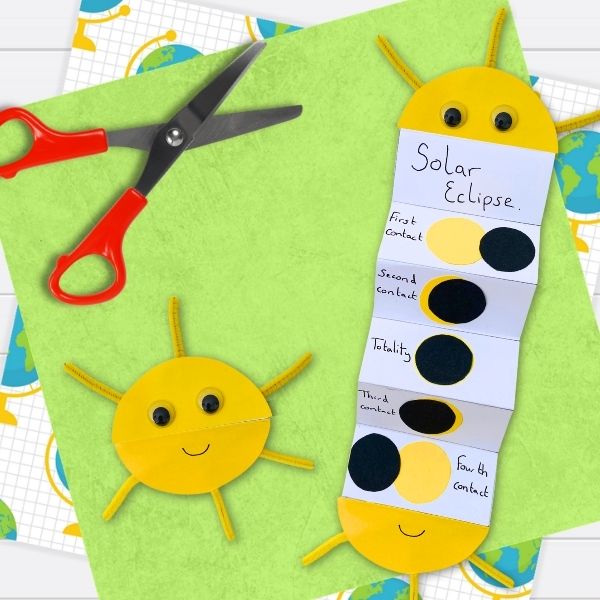
1. Make the large sun
First, draw a circle on the yellow piece of card for the large sun. I draw around the outside of a drinking glass for this but you could use a compass.
Cut out the yellow circle and fold it in half. Cut along the fold to make 2 equal-sized halves.
Optional: add some googly eyes to one half, and a smiley mouth to the other to give the sun some character!
2. Draw the template for the inside
Next, take a piece of white cardstock. The width of the rectangle should be the same as the straight edge on your sun halves. I made the length 24cm.
Once you’ve got a large rectangle, use a ruler and pencil to divide it into 6 equal boxes.
Add the tabs to the top and bottom of the template. These are to glue the sun halves onto later.

3. Create the suns and moons
For a total eclipse, you’ll need to cut out 5 black circles (moons) and 4 yellow circles (suns). The suns and the moons will be the same size. Make them no larger than the rectangles on the template.
Tip: Fold your paper/card to create more than one sun or moon at a time!
4. Arranging the suns/moons in the template
As you have 6 rectangles but only 5 stages, use the top rectangle to title your project (e.g. ‘Total Solar Eclipse’).
In the next 5 boxes, arrange the moons and suns to show the solar eclipse stages. If you are making a total eclipse, these will be as follows:
First contact: The Moon is starting to overlap the Sun.
Second contact: The Moon is almost covering the Sun.
Totality: The light from the Sun is blocked as the moon completely covers the disk of the Sun.
Third contact: The Moon starts to move away.
Fourth contact: The Moon no longer covers the Sun and the eclipse ends.

Once everything is arranged, glue the suns and moons in place. I added a little ‘glow’ around the Moon in the totality phase to show the Sun’s corona (atmosphere).
Write the stages onto the template if there’s space (if not, just number the stages).

5. Cut out the template
Cut around the outside of the template, taking care not to snip the tabs off!
Glue one of the yellow half-circles into the top of the template and one on the bottom.
Leave for a few minutes for the glue to dry.
6. Folding the template
Next, it’s time to fold. Fold alternately along the horizontal lines (like a zig-zag).
Open the sun to reveal the solar eclipse stages inside. Bring the two halves together again to hide them.
Optional: Add some rays to the outside of the sun using yellow or orange pipe cleaners/fuzzy sticks. Use tape to secure them in place.
Print and go option
I sell simple print-and-go templates as an engaging alternative to the craft above. Sequence a total or annular (ring of fire) eclipse with the stage names or short descriptions. The finished foldouts can be glued into an interactive science notebook for future reference by children and they’re a fun alternative to a worksheet!

You can buy the templates in my TeacherPayTeachers store here.